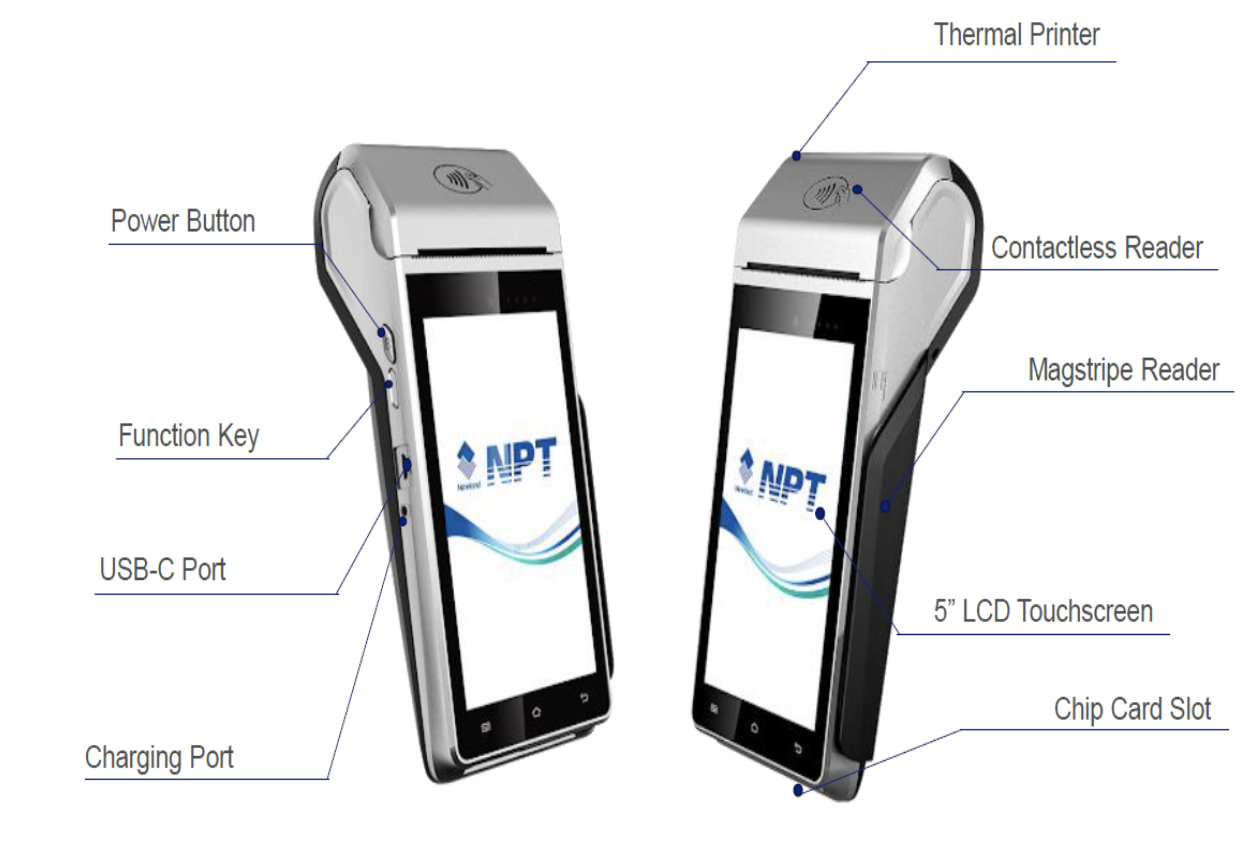
The Newland N910 is the next generation of payment hardware technology. An Android payment solution equipped to handle routine business operations and boost sales.

How to Set Up The Newland N910
Watch the video to learn how to set up your device.
Knowing the Product

Feature/Functionality
- Operates over WiFi, Bluetooth or 4G connection
- Front facing camera with flashlight and ability to read barcodes
- Optional charging dock with extra connectivity ports
- High powered internal battery, longer time between charges
Installing the Paper Roll

Installing the SIM Card (For Wireless Enabled Terminals)
Step 1: Turn off the Power
Step 2: Place the terminal face down
Step 3: Pull up the battery cover to open (Fig.1)
Step 4: Insert SIM card (Fig. 2 and 3)
Step 5. Press the battery cover to close (Fig. 4)

Initial Terminal Setup and Activation
- Device Placement
When connecting with a strong private WiFi or 4G connection, you have the freedom to place your device wherever you’d like to transact.
When utilizing the Newland Communication base for Ethernet connection the base will need to be located near your ethernet infrastructure or router.
- Power On
To turn on your device, press and hold the power button on the left of the device for 3 seconds.
- Connect
Your device will now walk you through activation and network setup,
After connecting, it may begin to update its software as required. This can take a few minutes. Allow the device to download, install, and reboot before getting started.
To connect to 4G:
Connection during initial setup
- Select Language - English - Canada
- Press Continue
- If your 4G SIM card was provided to your reseller organization, simply insert it into the device and you'll automatically be connected
- Create a new user login
- Accept Terms & Conditions
To connect to WiFi:
Connection during initial setup
- Select Language - English - Canada
- Press Continue
- Press Skip for Mobile Connection
- Select the desired WIFI Network
- Please note this must be a secured network utilizing WPA or WPA2
- Press Connect
- Create a new user login
- Accept Terms & Conditions
To connect to Ethernet
- Insert Ethernet Cable into Network (Router, Modem, Switch) & into the Base
- Plug the Base into power using the provided power adapter
- Press the power button on the Newland Terminal to power on (Left side Top most button)
Connecting during initial setup
- Select Language - English - Canada
- Press Continue
- Press Skip for Setup Mobile Network
- Select WIFI Network of Base Serial Number (ex. N78602507398)
- Enter Password - 00000000
- Press Connect
- Create a new user login
- Accept Terms & Conditions
Connection Settings after Terminal has been activated
To connect to 4G:
Connection once the device has been activated
- Power off the device
- Remove the back cover of the device
- Insert the SIM card with the contacts facing down in the top right most corner
- Power the device back on by pressing the power button for 3 seconds
- The device will automatically determine the APN and connect to the cellular network
To connect to WiFi:
Connection once device has been activated
- Swipe down from the top of the screen twice
- Select WLAN
- Select the desired WIFI Network
- Enter Password for the WIFI Network
- Please note this must be a secured network utlilizing WPA or WPA2
- Press Connect
To connect to Ethernet
- Insert Ethernet Cable into Network (Router, Modem, Switch) & into the Base
- Plug the Base into power using the provided power adapter
- Press the power button on the Newland Terminal to power on (Left side top most button)
Connecting once the device has been activated
- Swipe down from the top of the screen twice
- Select down arrow below WLAN to select a network
- Select WIFI Network of Base Serial Number (ex. N78602507398)
- Enter Password - 00000000
- Press Connect
.png?height=120&name=Logo_1131x105%20(1).png)