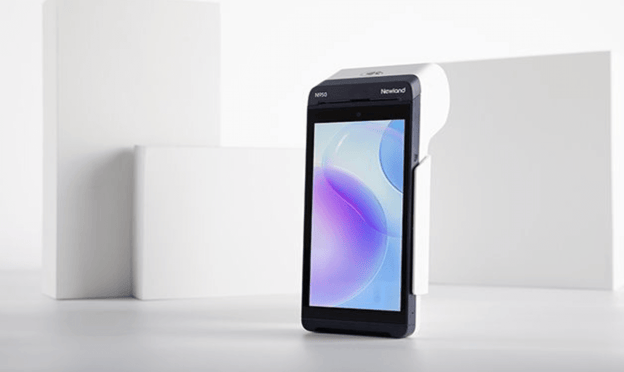
Ensure you stay competitive with customer payment demands using the Newland N950 Smart Terminal.Our premier point-of-sale software, Newland is a sleek and efficient payment companion that helps handle daily operations and boost sales.
Wifi Activation Video: https://drive.google.com/file/d/147ytzyYh0j_LidM52rn8s4xOX4hU0akj/view
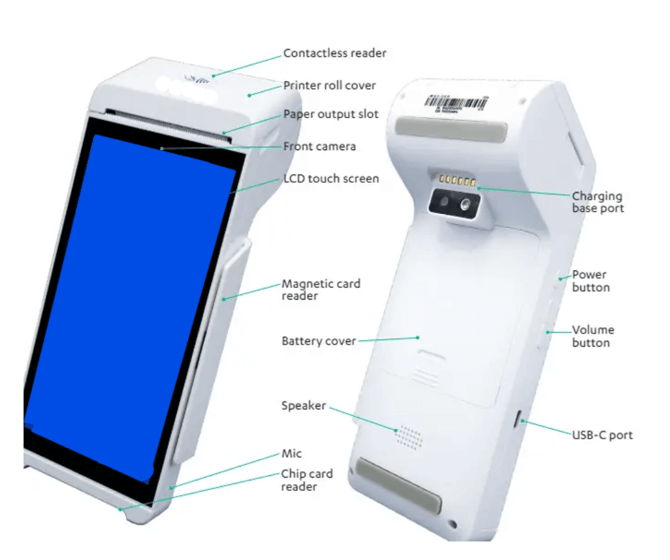
Knowing the Product
Feature/Functionality
- Keep Going: A high-powered lithium battery ensures extended usage on a single charge.
- Wireless Freedom: Sleek and portable, it looks great on the counter or on the go. Supports WiFi and 4G.
- Reliable Security: Stay protected with fully PCI-compliant security, ensuring safe payment data and customer information.
- All-in-One Terminal: The Smart Terminal Flex is WiFi and 4G-enabled, featuring a touchscreen, built-in printer, barcode scanner, and long-lasting battery—ready to go wherever business takes you.
- Payment Flexibility: Accepts swipe, chip, and contactless Payments at the counter, table, or on the move.
- On Display: A crisp 5.99” LCD touchscreen with an embedded camera and adjustable backlight for effortless navigation.
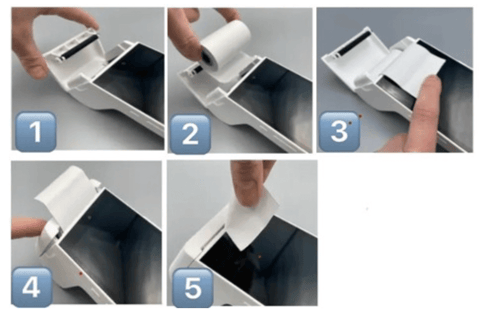
Installing the Paper Roll
- Open the Printer Roll Cover
Lift the cover to access the paper compartment. - Insert the Paper Roll
Place the roll inside, ensuring it follows the direction shown in the diagram inside the compartment. - Pull Out the Paper
Extend approximately 5 cm of paper so that it protrudes from the top of the terminal. - Close the Cover
Press down firmly until you hear an audible ‘click,’ confirming it’s securely closed. - Remove Excess Paper
Tear off any extra paper along the serrated edge.
Installing the SIM Card
- Press the power button for 3 seconds and select Power off to shut down the device
- Remove the back Cover
- Gently lift the battery to expose the SIM Card Slot
- Slide in the SIM Card. Note: The direction of the SIM Card is critical.
- Reposition the battery.
- Replace the cover.
- Reboot the Terminal.
- Once rebooted, the 4G image will show at the top of the screen.
.png?width=255&height=262&name=unnamed%20(3).png)
.png?width=255&height=260&name=unnamed%20(24).png)
.png?width=254&height=255&name=unnamed%20(25).png)
.png?width=291&height=256&name=unnamed%20(2).png)
.png?width=256&height=269&name=unnamed%20(27).png)
.png?width=256&height=284&name=unnamed%20(28).png)
.png?width=256&height=278&name=unnamed%20(29).png)
.png?width=252&height=344&name=unnamed%20(1).png)
Initial Terminal Setup and Activation
Device Placement
- When connecting with a strong private WiFi or 4G connection, you have the freedom to place your device wherever you’d like to transact.
Power On
- To turn on your device, press and hold the power button on the left side of the device for 3 seconds.
Connect
- Your device will now walk you through activation and network setup.
- After connecting, it may begin to update its software as required. This can take a few minutes.
- Allow the device to download, install, and reboot before getting started.
Connection Settings During initial setup
To connect to WiFi:
Connection during initial setup
- Select Language - English - Canada
- Press Continue
- Press Skip for Mobile Connection
- Select the desired WiFi Network
- Note: This must be a secured network utilizing WPA or WPA2.
- Press Connect
- Create a user login
- Accept Terms & Conditions.
To connect to 4G:
Connection during initial setup
- Select Language - English - Canada
- Press Continue
- If your 4G SIM card was provided to your organization, simply insert it into the device and you'll automatically be connected.
- Create a new user login
- Accept Terms & Conditions
- Ensure you see 4G connection at the top of the screen
- Perform a test transaction using Mobile Data to ensure the SIM Card is connected.
Connection Settings after Terminal has been Activated
To connect to WiFi:
Connection once the device has been activated
- Swipe down from the top of the screen twice.
- Select WLAN.
- Select the desired WiFi Network.
- Enter Password for the WiFi Network.
- Note: This must be a secured network utilizing WPA or WPA2.
- Press Connect.
To connect to 4G:
Connection once the device has been activated
- Power off the device.
- Remove the back cover of the device.
- Insert the SIM card with the metal contacts facing down.
- Power on the device by pressing the power button for 3 seconds.
- The device will automatically determine the APN and connect to the cellular network.
For support, please contact the Paystone help desk via email: support@paystone.com or call 1-888-900-9192.