With Clover Flex, you can accept payment any way your customers prefer. Customers can insert, swipe, or tap a card, or use Apple and Google Pay by tapping an NFC-enabled phone or watch on the contactless payment reader.
Here’s a guide to what’s in the box, what features are on the Flex, and how to get ready to use it.
What's in the box
Flex with silicone sleeve


Power brick

Power cord

Receipt paper roll

Find out how to buy more receipt paper.
What's on the Flex

- Use the power button to turn the Flex on and off.
- Insert cards into the chip card reader.
- Slide cards through the magnetic stripe reader.


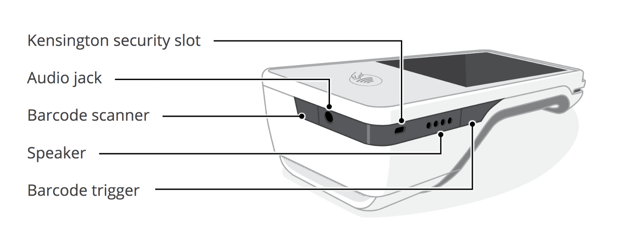
- Customers can tap chip cards or NFC-enabled phones or watches on the contactless payment reader on the display screen.
- Use the camera/scanner to scan barcodes and QR codes and take photos of personal checks. Hold down the trigger while pointing the Flex at the item to scan or photograph. Release the trigger when the display screen shows that it’s been processed.
- Pull down on the receipt paper door to load paper.
- The USB-C charging port can be used with Clover’s travel kit power charger (available separately) or any USB-C charging cable.
The Flex also comes with a SIM card installed.
Activate the Flex
The first time you turn on the Flex, you’ll be taken through steps to activate the device and set it up for use.
Before activating the Flex, make sure your WiFi router is set up, connected to the internet, and has a security level of WPA or WPA2. Your network needs to be a closed, protected, secure network to process payment transactions. Learn more about best practices for network connections.
- Hold the Flex so the back of it faces you.
- Open the paper compartment by grasping the top of the compartment door and pulling it toward you.
- Insert the roll of paper so that the end extends straight out of the slot in the top of the compartment door.
- Close the compartment door until it clicks.
- On the display screen, tap to print a test receipt.
Set a passcode to secure your Flex
During activation, you’ll have the opportunity to set a passcode. If you already have an admin account, the activation process will not include this step.
Setting a passcode adds an extra layer of security. Employees can have individual passcodes, which makes it easy to track their sales and attendance. You can set passcodes on the Web Dashboard or on the device using the Employees app.
Charge the Flex
The Flex arrives with enough battery power to set it up and activate it. You can fully charge it whenever you have the time.

- Holding the charging cradle upside down, firmly insert the cord attached to the power brick into the charging port and thread the cord across and out the back.
- Plug the power cord into the power brick.
- Plug the power cord into a grounded power outlet and set the Flex on top of the charging cradle.
Allow the device to charge until the indicator lights on the cradle turn solid green.